Thursday, November 22, 2012

Sun-Dried Tomato and Parmesan Bread


Today is a beautiful and warm Thanksgiving Day here in Minnesota!  We usually celebrate Thanksgiving at my parent’s house, but this year they’re with my brother Steve and his family in Chicago.  We’ll miss them but we’re excited to spend the afternoon gorging ourselves at Troy’s sister Tracy’s house.  Thanksgiving is one of my favorite holidays…it’s great day to reflect on all the blessings in our lives and to eat loads of amazing food at the same time!

A couple years ago, Melis and I were on a bread baking (aka thigh enlarging) kick.  My friend Kristina introduced us to the recipes from the “Artisan Bread in Five Minutes a Day” cookbook.  Once we started baking, we couldn’t stop.  We made plain artisan 
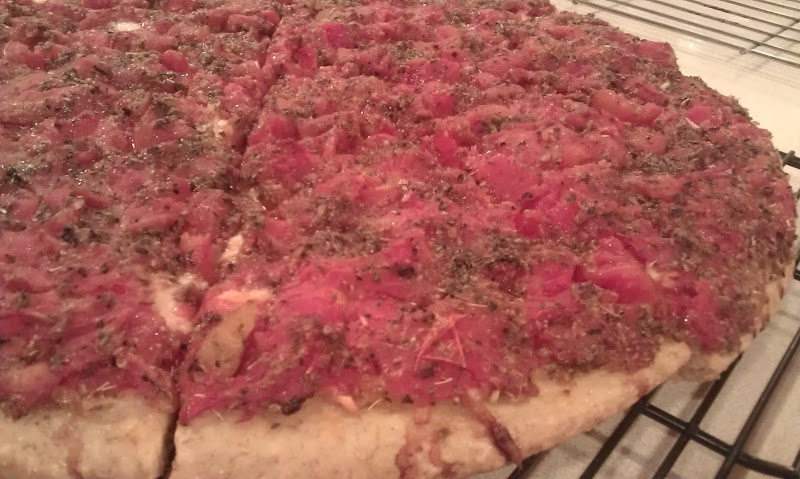
loaves, cinnamon rolls, ten-grain bread and our favorite: Sun-Dried Tomato and Parmesan Bread.  Our bread adventure lasted about a month and in that time, Melis, Troy and I each gained at least 5 pounds.  It was a very dark and delicious time. :)

Don’t let my tale of gluttony turn you off to this delicious bread.  Use some self control and ENJOY!

Sun-Dried Tomato and Parmesan Bread
From “Artisan Bread in Five Minutes a Day”, shared by Kristina DeNucci

Makes 1 loaf

  • 1 pound of pre-mixed dough (master recipe below)
  • Olive oil for brushing the loaf (I like to use the oil that the sun-dried tomatoes are in)
  • ½ cup oil packed, sun-dried tomatoes, roughly chopped
  • ½ cup grated Parmigiano-Reggiano cheese (use the good stuff…it’s worth it)
  • Dried basil
  • Dried oregano
  • Cornmeal for pizza peel (or parchment)

On a flour dusted surface, roll out dough into a ¼ inch thick rectangle.  Brush dough with olive oil.  Sprinkle surface with basil and oregano.  Scatter the sun-dried tomatoes evenly over the dough. Top with the grated cheese.  Starting from the short end, roll the dough into a log and gently tuck the ends under to form an oval loaf.  Allow to rest and rise on a cornmeal covered pizza peel or piece of parchment for 1 hour.  Twenty minutes before baking, preheat oven to 450°, with a baking stone placed on the lowest rack and an empty broiler tray for holding water on any other shelf.  DO NOT USE GLASS, it will shatter.  Right before putting bread in the oven, brush the top of the dough lightly with olive oil, sprinkle with more herbs and slash parallel cuts across the loaf, using a serrated bread knife.  Slide the loaf directly onto the hot stone. Quickly but carefully pour about 1 cup of hot water from the tap into the broiler tray and quickly close the oven door to trap the steam.  Bake loaf for about 30 to 35 minutes or until the crust is nicely browned and firm to the touch.  Allow to cool before slicing or eating.


Artisan Free-Form Loaf Dough Master Recipe
Makes four 1-pound loaves

  • 3 cups lukewarm water
  • 1 ½ tablespoons granulated yeast
  • 1 ½ tablespoons kosher salt
  • 6 ½ cups unsifted, unbleached, all-purpose white flour, using the scoop and sweep method (don’t press the flour into the dry measuring cup, just scoop it up and sweep the top level with a knife or spatula).


Warm the water to 100°.  Add the yeast and salt to the water in a 5 quart container.  Mix in the flour; kneading is unnecessary.  Add all the flour at once.  Mix with a wooden spoon, stand mixer or food processor until everything is uniformly moist, without dry patches; this will take just a few minutes to do.  Do not knead.  Loosely cover with a lid, allow to rise at room temperature until it begins to collapse, approximately 2 hours depending on room temperature.  Refrigerate until ready to use. 

To make a plain free-form artisan loaf, dust the surface of the dough with flour then cut off a grapefruit size ball of dough with a serrated knife.  Gently stretch the surface of the ball of dough around to the bottom, rotating as you go.  The process should take 30 to 60 seconds.  Place the round loaf on a cornmeal-dusted pizza peel or piece of parchment.  Allow to rise for 40 minutes.  Twenty minutes before baking, preheat oven to 450°, with a baking stone placed on the lowest rack and an empty broiler tray for holding water on any other shelf.  DO NOT USE GLASS, it will shatter.  Right before putting bread in the oven, dust the top with flour and slash a design (cross, tic tac toe pattern or scallops) into the top of the loaf.  With a quick forward jerking motion, slide the loaf onto the preheated baking stone.  Quickly but carefully pour about 1 cup of hot water from the tap into the broiler tray and quickly close the oven door to trap the steam.  Bake loaf for about 30 minutes or until the crust is nicely browned and firm to the touch.  Cool on a rack, slice and eat.  Store remaining dough in the refrigerator and use within 14 days.

ENJOY!
~Julie :)

Sunday, November 18, 2012

Roasted Carrot Soup

Well the weather here in Minnesota sure doesn't feel like November weather these days!  It's been BEAUTIFUL, sunny, and relatively warm for this time of year!  It's made what is normally a cold, gray month that drags on forever actually pleasant and enjoyable!  Even though the temps are on the warmer side (when I say warmer I'm talking upper 40s maybe some 50s) it's totally still soup weather in my book!  Today was spent making Roasted Carrot Soup for our patient appreciation week that starts tomorrow and goes through Wednesday!

When I first found this recipe it sounded good but I really wasn't so sure about it.  It was SO simple with limited ingredients that I had no idea if it'd actually be something that was full of flavor or if it'd just seem like I was drinking a carrot.  So... I brought the recipe over to Julie's and we decided to give it a shot but we didn't really have our hopes too high for it!  We were in for a pleasant and tasty surprise that we've made many times since.  Over the year or so that we've been making it we've made a few changes to make a fast and easy recipe even faster and easier!  This truly is a simple recipe with amazing flavor.  It'll turn even the cooked carrot haters (Julie's sons... who tried it without knowing what it was and LIKED it until we told them it was carrots haha!) into lovers, ok maybe just likers or tolerators... but they won't hate it!

This soup is perfect for a cool fall day... warming to the insides and delicious on the tongue it's sure to turn even the cold and gray days into happy ones!  We hope you enjoy it as much as we have!  Ps... it is a great soup to freeze into single serving containers for those times you just want something familiar but don't have the time to cook!  Enjoy!

Roasted Carrot Soup
Adapted from food52
Servings: 4

6 to 8 large carrots (about 1 3/4 pounds)
1/4 cup olive oil
Salt
6 cups vegetable stock (good quality, not too high in sodium)
1 piece ginger, an inch long, peeled
A few sprigs of thyme, plus more for garnish
1/2 large sweet onion
2 large garlic cloves, chopped
Freshly ground black pepper

1.  Peel and cut the carrots, onions, whole garlic cloves, and ginger (roughly chopped) and combine on a large baking sheet.  Drizzle with olive oil and sprinkle with salt.  Set your oven to Broil and move the rack up so it's about 6-8 inches from the top.  Broil the carrots, onions, garlic and ginger making sure to stir every now and then.  You should get a nice char on the vegetables and the carrots should be soft (about 30 minutes give or take)

2.  Meanwhile, bring the stock to a boil, add the sprigs of thyme and simmer gently for 15 minutes.

3.  Remove the sprigs of thyme from the broth and add in the carrots when they are done.  Let simmer for a few minutes then using an immersion blender blend mixture till smooth.

4.  Serve with fresh thyme to garnish and enjoy!
* This soup pairs great with a grilled cheese sandwich using Munster!


Friday, November 16, 2012

Raspberry French Toast Bake


With Thanksgiving fast approaching the time seems to be flying by faster than ever.  The last week has been filled with all sorts of stuff and it only seems to get more busy with each day!  I just finished making a monster batch of Julie's Chocolate Peanut Butter Protein Balls... I mean HUGE!  I made enough to almost fill a gallon size ziploc bag!  It took me over an hour but I was enjoying myself on this Friday night listening to a video and making loads of protein balls.  The weekend will be filled with more cooking... roasted carrot soup, mixing up a batch of almond butter, and getting all the ingredients ready to make a double batch of pumpkin oatmeal for next week.  All this food is for an awesome thing I have going on next week!

For the 3 days before Thanksgiving at my dad's office (he's a chiropractor and I work there with him!) we're having a patient appreciation celebration.  It'll be filled with goodies, free care for our patients, laughter, music, and fun!  It's a time for us to thank them for being our patients!

Anyway... back to the food and more importantly the Raspberry French Toast Bake.  This recipe comes from my cousin and the first time I tried it I loved it!  Who would have thought someone who doesn't cook would have such a stellar recipe!  (Really... she doesn't like to cook and she sometimes claims she doesn't know how... I think she just knows there's plenty of cooks in the family and she'd rather eat our food than slave over the stove :) haha)  Either way... she delivered big time with this one.

All the prep for this recipe is done the night before so in the morning all that's pretty much required is waking up to pop it in the oven!  It's a warm, chewy and slightly crunchy breakfast that'll fill your belly and warm your soul.  Hope you enjoy it as much as my family does!

- Melissa

Raspberry French Toast Bake
Recipe from Michelle Gaertner

12 slices cinnamon bread, pulled into clumps (use the whole loaf or more, it should fill the entire pan)
5 eggs, beaten
1 3/4 C milk
1/4 tsp cinnamon
1/4 tsp nutmeg
1/2 C sliced almonds
1/4 C butter - melted
2 C raspberries (can be bought frozen, but defrost)

In a greased 9x13 pan add:
eggs, beaten
milk
1/2 C brown sugar
cinnamon
nutmeg

Pour over clumped cinnamon bread and let sit for 8 hours (overnight)
Remove from fridge 1 hour before baking

Drizzle with mixed almonds, melted butter and 1/2 C brown sugar  (put on before baking)

Bake at 400 degrees for 25 min uncovered
Add raspberries for an additional 10 min
Total Bake time 35 min


Tuesday, November 13, 2012

Pozole Verde


On Saturday, Melis and I did some fall soup cooking!  We conducted our own “Battle of the Pozoles---Rojo vs. Verde”.  You can find the info for the Pozole Rojo recipe here.  On the flip side of that delicious coin is Rojo’s sassy cousin, Pozole Verde.  The green version is everything the red is not.  Where the red has earthiness, the green has tang… the red is robust, the green is piquant.  BOTH are delicious.

Tomatillos lend a snappy tartness to the base of this soup.  The chile peppers and herbs balance perfectly with the chicken and hominy.  It’s a full meal in a bowl….hearty and refreshing at the same time.  Add delicious garnishes like avocado, sour cream, purple cabbage and cilantro and it’s like a fiesta in a bowl!  

I always make a double batch of Pozole Verde and TRY to get some in the freezer before it all gets eaten.  It freezes beautifully!

Pozole Verde
Inspired by an amalgamation of internet recipes; this is our final perfected version.
  • 8 cups chicken stock
  • 4 boneless, skinless chicken breasts, poached and shredded
  • 2 Tbsp olive oil
  • 1 medium onion, diced
  • 4 garlic cloves, minced
  • 1 pound tomatillos, husked and quartered
  • 2 poblano peppers, seeded and diced
  • 2 serrano peppers, seeded and diced
  • 1 bunch of cilantro, chopped
  • 1 Tbsp dried oregano leaves
  • 3 15 oz. cans hominy, drained and rinsed
  • Salt and pepper to taste

Garnish items: diced avocado, shredded purple cabbage, sour cream, lime wedges, serrano slices and tortilla chips.

Poach your chicken breast and set aside.  To perfectly poach chicken, follow these steps:  Put chicken breasts in a pot and cover with stock or well seasoned water.  Bring to a boil then quickly reduce to a simmer.  Partly cover and simmer for 10 minutes.  Turn heat off completely and allow chicken to remain in hot water for 15 minutes.  Remove, cool slightly and shred.

In a large pot, heat olive oil to medium, sauté onions and garlic until softened. Add tomatillos, poblanos, serranos, oregano, cilantro and 2 cups of chicken stock.  Boil till softened, about 20 minutes.  Using a stick blender, blend till the mix is the correct consistency of smoothness for your preference (just go buy a stick blender …they’re awesome…but if you live a million miles away from a Target, you certainly can carefully blend this in batches in your blender).  Add remaining stock, hominy and shredded chicken to the soup base, heat through.  Adjust seasoning.

Line up the garnish buffet, load up your bowl, crack a cold Sol beer and enjoy this amazing soup!

ENJOY!
~Julie


Monday, November 12, 2012

Pozole Rojo


I’m a total soup junkie.  I could eat soup every single day of my life.  And, there’s no better time to make all sorts of soup than November in Minnesota!  Case in point, my weekend:  On Saturday, Melis and I got together for a “Battle of the Pozoles--Rojo vs. Verde" (Pozole Verde recipe here) and on Sunday, my parents came over for my Faux Pho.  Three amazing soups in 36 hours…definitely a good distraction from the brown grass and gray skies.

The jury is still out on exactly who won the Battle of the Pozoles.  I think in the end, it just might be a tie…a very delicious tie. 

We started with the Pozole Rojo which is basically a pork and hominy stew.  It’s a robust, earthy soup that’s satisfying on so many levels; it has heat from the serrano peppers, massive flavor from the garlic and herbs and that familiar taste of fall from a touch of ground cloves.  It truly is the perfect comfort food for a chilly fall day. 

Pozole Rojo
Inspired by an amalgamation of internet recipes; this is our final perfected version.
  • 2 fresh poblano peppers
  • 4 Tbsp olive oil
  • 2 pound pork loin, cut into 1 inch cubes
  • 1 onion, diced
  • 10 cloves garlic, minced
  • 2 serrano peppers, minced
  • 1 tsp dried oregano
  • 2 tsp ground cumin
  • 1 tsp chile powder
  • ¼ tsp ground cloves
  • ½ tsp kosher salt
  • 1 bunch cilantro, chopped
  • 8 cups chicken stock
  • 1 (19 oz) can red enchilada sauce
  • 2 (29 oz) cans white hominy, drained and rinsed

Preheat your oven’s broiler and set the top rack about 6 inches from the heat source.  Line a baking sheet with foil.  Place the poblanos on the baking sheet.  Broil the peppers, turning frequently, until the skin is blackened and blistered.  Place blackened peppers into a bowl and tightly seal with plastic wrap.  Allow to cool for about 20 minutes.  When the peppers are cool, peel away the skin, discard the seeds and dice the poblanos.  Set aside.


Heat 2 tablespoons of olive oil in a large pot at medium high heat.  Add cubed pork loin.  Saute pork until all the juices are evaporated and pork begins to crisp on the outside (if necessary, add more olive oil to help out with the crisping process).  Remove pork and set aside. 

Add the remaining olive oil to the pot, heat to medium.  Saute onion and garlic until the onion has softened.  Stir in the poblanos, serranos, oregano, cumin, chile powder, cloves, salt and cilantro.  Cook for about 1 minute.  Pour in the chicken stock and enchilada sauce.  Stir in the pork.  Bring to a simmer over medium high heat.  Reduce heat to medium low, cover and simmer for 1 hour.  Stir in hominy, recover and continue cooking for another hour or until the pork is tender.

Serve this comforting soup with a big dallop of sour cream, some diced avocado, a few sliced serranos (if you're brave) and a few sprigs of cilantro.  DELISH!


ENJOY!
~Julie

Wednesday, November 7, 2012

Cookiversary = Pizza!

Hello hello!  November is a special month for us because it's the month of our very first time cooking together!  Officially, November 3, 2009 is the first time we ever ventured into the kitchen together and it became the beginning of our friendship/love for cooking together!  I had Julie and her sister-in-law Tracy over to teach them how to make my dad's pizza, sample some Melanzane and try my dad's fresh baked bread.

Yep, that's me squishing the tomatoes for the pizza.  I was in heaven!
Little history on the pizza before I get into the details of the night...  My grandpa owned a restaurant (he was also a St. Paul cop) and my dad grew up working there.  One of the pizzas they used to make in the restaurant was a little different than what you'd expect from the typical American pizza.  It started with a thicker crust topped with romano cheese, a little mozz, canned whole tomatoes that were broken up by hand and spread over the cheese and seasoned with olive oil, salt, pepper, oregano, basil, and slices of garlic.  I remember eating this pizza as a kid when my grandpa made it and he used a thinner crust sometimes which I think I loved if I remember correctly!  The crazy thing about this pizza is that the cheese was between the crust and the tomatoes, not on top.  As a kid I think it took some getting used to but as the years went by I really started to enjoy it and develop a love for this pizza... my family's pizza!  I used to love helping my parents my our pizza when I was a kid.  It had the potential to be a VERY MESSY job... squeezing the juice out of the whole tomatoes took some skill and even the most seasoned squisher managed to squirt juice all over at times! 


So back to our Cookiversary night.  I had everything ready to go when they arrived, the pizza crusts had been made on a different day, it takes some time to make the dough, let it rise, roll them out and bake them.  I had about 8 cans of whole tomatoes, tons of garlic, romano and mazz grated, and all of the rest of the seasonings.  We put a strainer in a big bowl and dumped all the tomatoes into the strainer so we could squeeze the juice out of them before putting them on the pizza.  Building the pizzas goes a little something like this...

1.  Spread romano cheese all over the already baked crust

2.  Spread some mozz over the top of the crust, as much or as little as you'd like but we     typically don't go cheese crazy when we make these

3.  Empty the cans of tomatoes into a big strainer/bowl.  Grab a tomato or two and stick your thumb into it to relieve the pressure and squeeze the juice out.  As hard as you'll try to keep it all in the bowl... you're guaranteed to squirt the person across/next to you haha!

4.  Break up the tomatoes over the cheese until all of the cheese is covered with chunks of tomato.

5.  Scatter sliced garlic on top of the tomatoes and then push them down underneath so they don't burn.

6.  Sprinkle tomatoes with salt and pepper then oregano and basil, be generous.

7.  Lastly, drizzle tomatoes with olive oil and use your finger tips to work the seasonings into the tomatoes.

8.  If the pizzas seem a little dry some of the reserved tomato juice can be sprinkled onto the top.

9.  Preheat oven to 350 degrees and bake for about 40 min... you'll just have to keep your eye on them as they go but they will take for sure 30 min.

We made 2 big pizzas and while they baked we snacked on some Melanzane and fresh baked bread!  A totally new experience for both Tracy and Julie and they loved it!  I loved sharing my food/family recipes with friends (especially since they thought it rocked)!  It was a great night and a night that we'd repeat every year for the next 3 years!

This year we were short on time (life is busy, ya know?!).  We made a last minute decision to get together and make pizza but we'd have to settle for regular pizzas on our cookiversary and find another night to make the real thing.  We grabbed some necessities from the store and swung by a local pizza joint and bought a few dough balls for 16" pizzas (awesome discovery... great dough and super cheap.  We paid $3.00 for 4 large dough balls!)  We really kept it simple and made a cheese pizza and a few pepperoni pizzas seasoned with basil, oregano, and garlic salt.  They were still delicious and it was a great year to spend our 3 year cookiversary!

Looking back on the last 3 years it's hard to believe we've managed to cook all the things we have.  We've made TONS of amazing recipes and only a few that didn't quite turn out how we hoped.  We've been pleasantly surprised, rarely defeated (we always blame it on a crappy recipe if our food doesn't turn out haha!), and extremely happy.  Cooking has been at the center of our relationship, it has given us a great opportunity to hang out and create a bond that I believe few people have these days.  Through our food we've been blessed with showing our love to our family and friends and they have benefited from the delicious treats they get to consume.  I think I can speak for both of us by saying we look forward to the many more meals we get to create together as our relationship continues to develop.  Enjoy your family and friends, find an activity that allows you to bond with the people you love.  Enjoy the relationships, the ups and the downs.  Learn to love all parts of life and go through them with those closest to you.

We hope you enjoy the food we continue to make and can make some of it with the ones you love!

Enjoy!

MELISSA


French Pancake (Pannekoeken)


Ever since I was a very little girl, I've loved to experiment in the kitchen.  One of the very first recipes I made came from a church cookbook (I’ll never forget…page 55) and it was for “French Pancake”.  Some of you might know this recipe better as a pannekoeken or puff pancake or possibly a Dutch pancake.  No matter what you call it or how you dress it up, it’s delicious and so easy to make.  I've modified the original recipe to make it a single serving size. 

French Pancake (Pannekoeken)

  • 2 eggs
  • 1/3 cup flour
  • 1/3 cup milk
  • ¼ tsp salt
  • 1 tbsp butter

Preheat oven to 425°. Put butter in a small saute pan; place in oven to allow butter to melt while preparing the rest of the recipe.  Mix all remaining ingredients together; blend well (I use a stick blender).  When the butter is fully melted, swirl the pan to allow butter to coat the sides.  Add egg mix, place in oven and bake for 15 minutes.  The pancake will puff up beautifully while it bakes but as soon as you remove it from the oven, it will fall.  That’s normal.  Slide it onto a plate and eat it plain, with syrup, fruit, jam, powdered sugar…be creative…I've thrown bacon on it and it’s delish.

Enjoy!
~Julie

Sunday, November 4, 2012

Pumpkin Gingerbread


I’m so fortunate…..I have 3 wonderful sisters-in-law.  On the Anderson side, Troy’s sister Tracy is a foodie like me and Troy’s brother Todd is married to Kari who is an amazing cook!  On my side, my brother’s wife, Sue is both foodie and awesome cook!  Family gatherings on both sides are always loaded with DELICIOUS food!!!!
Sue gave me this recipe for Pumpkin Gingerbread years ago and I’m sure I've made hundreds of loaves.  My kids love it, I love it, it freezes well and since it has the word pumpkin in it you feel like it’s not that bad for you.  
  
You probably have most of the ingredients for this recipe in your cupboard already.  Heck, make a double batch and give one to a friend or neighbor! 

Pumpkin Gingerbread
Recipe from Sue Kloos

  • 3 c. sugar
  • 1 c. vegetable oil
  • 4 eggs
  • 2/3 c. water
  • 1 16oz. can pumpkin
  • 2 tsp. ground ginger
  • 1 tsp. allspice
  • 1 tsp. cinnamon
  • 1 tsp. cloves
  • 1 tsp. nutmeg
  • 3 ½ c. flour
  • 2 tsp. baking soda
  • 1 ½ tsp. salt
  • ½ tsp. baking powder

Mix sugar, oil and eggs together; add water, pumpkin and spices.  Mix in dry ingredients.  Pour into 2 large greased loaf pans.  Bake @350° for 1 hour. 


Enjoy!

~Julie
  

Wednesday, October 31, 2012

The Black Sea restaurant


 It's time for another restaurant review!  A year ago... or maybe it's been two years now, Julie and I decided that we didn't love the gift giving obligation that came with holidays (it makes it ten times harder to find a good gift when you're under pressure) so we changed it up.  Since we love food and trying new places to eat we figured we could each pick a restaurant and treat the other person to a meal, that way we got to experience new foods/restaurants and do something for the holiday too.  Oh... and there isn't really a time frame on using this gift except that it has to be done before that holiday comes up again the next year!  

A few weeks ago we finally made it out for what was going to be my Christmas pick, yep that's right... we waited until October to use it haha (it's harder than you'd think, don't judge!)  Anyway back to the good stuff, a buddy of mine had told me how he went to this awesome restaurant in St. Paul called The Black Sea and that he really had a good experience there.  That's all I needed to know to pick this place as my spot.  Everything was unplanned and totally last minute which made the experience even better!  We headed out that way having no clue really what to expect except that it was supposed to be good and realizing we have both probably driven by it a million times and never even knew it existed.

We walked into a small (really... it was tiny) hole in the wall restaurant with about 10 tables crammed in and the place was packed!  Not only were pretty much all of the tables occupied with happy, hungry (and full) people but there were more people standing who were either picking up food or waiting to order food to go!  That was a great sign to us and we managed to find a table that someone was just getting up from.  

One of the awesome things about this restaurant is you could order apps and meals for one person OR family style.  After reading through the whole menu we decided we wanted to try one of the appetizer combos that included dolmas, falafel, and hummus accompanied by olives, feta cheese, tomatoes, lettuce, lemon, pepperoncini and pita bread.  We figured we should probably just get the single serving and split it so we could have room for our meal as well.  What a great appetizer and fun to try so many different things!  

Our meal consisted of another combo (we really wanted to try as much as possible and... we were having trouble deciding what we wanted) and this time we ordered it for 2 people.  It was delivered on a HUGE plate that contained... chicken and beef kebab, chicken, beef, and lamb doner, 2 kofte kebabs all topped with grilled onions and peppers, lettuce topped with tomatoes and onions, pita bread and two sides: french fries (random, huh?) and rice.  Sounds like lot of food? It WAS!!  It looked a little something like this... (sorry for the poor picture quality)

That plate of food was amazing.  We loved everything and even better was the awesome sauce they served with it which they made from homemade yogurt, cucumber, and garlic (we put it on EVERYTHING).  Besides the food being delicious the service was great as well.  Everyone was incredibly nice and I think they kind of got a kick out of our love for their food.  They were the real deal!  I'd totally recommend this place if you're ever in the St. Paul area close to the fair grounds.  It's worth the trip even if you're not in the area!  Head over there some evening with empty stomachs and close friends and enjoy rubbing elbows with each other over some amazing and authentic food.  You won't be disappointed!

~ Melissa


Pumpkin Cashew Coconut Curry

Good morning!  This week has (again) been crazy busy but I've managed to get a few new things made!  Yesterday was another day full of kitchen time wooohooo!!!  My cousin came over and we made Roasted Carrot soup, date balls (you know... those things Julie posted about earlier except without the peanut butter goodness), and a new one Pumpkin Cashew Coconut Curry with coconut rice (using cauliflower as the rice, I'll explain that more in a little bit).

I found this recipe on one of my new favorite blogs, PaleOMG (and YES, this is another Paleo recipe!) and it sounded good, sort of easy, and a lot different than most of the stuff that we usually make.  You'll start to figure out that Julie and I have a habit of making Asian or Mexican food most of the time with a little Italian thrown in there as well.  We haven't tackled too much Indian cuisine so I decided to give this a try!  I've eaten Indian food before, not often but it's not completely foreign to me except I really haven't had much curry.  So... yesterday morning I visited the grocery for what seemed like the millionth time this week and got all my ingredients for this new recipe.  It went a little something like this...

Pumpkin Cashew Coconut Curry over Coconut Rice
Source: PaleOMG
Prep time:           Cook time:             Total time: 
Serves: 4-5
Ingredients
For the curry
  • 1lb chicken, cut into cubes
  • 2 garlic cloves, minced
  • 1 red onion, sliced
  • ⅔ cup canned coconut milk
  • ½ cup pureed pumpkin
  • ½ cup cashews
  • 2-3 tablespoon curry powder
  • 1 tablespoon coconut oil
  • 1 teaspoon ground cumin
  • ½ teaspoon cayenne pepper
  • ¼ teaspoon red pepper flakes
  • pinch of cinnamon
  • salt and pepper, to taste
  • cilantro, to garnish
 For the coconut rice
  • 1 head cauliflower, stem removed, roughly chopped
  • ½ cup canned coconut milk
  • ¼ cup unsweetened shredded coconut
  • 1 tablespoon coconut oil
  • 1 teaspoon raw honey
  • pinch of salt

Instructions
  1. First add your chopped cauliflower to your food processor with the shredding attachment to “rice” the cauliflower or just chop it up with the blade in the food processor
  2. Pull a large pot, place over medium heat, and add a tablespoon of coconut oil then add your cauliflower. Add a pinch of salt, then cover to help steam, mixing occasionally.
  3. Now pull out a large skillet and place under medium heat. Then add your coconut oil.
  4. Add your chicken stirring occasionally... when the outsides start to turn white, throw in your garlic and let that go for a min or two until the garlic becomes fragrant
  5. Add your ⅔ cup coconut milk and pureed pumpkin to your chicken and mix until the pumpkin breaks down.
  6. Now add your sliced onions and spices to cook down, you can turn the heat down just a little and cover it for a few minutes.
  7. Then add your other ingredients for your coconut rice and cover to cook down. Stir occasionally to make sure it doesn’t burn!
  8. Let the rice cook for about 5-8 minutes until coconut milk has evaporated and you have sticky rice.
  9. When chicken is done cooking and your curry has thickened a bit, remove from heat and add your cashews to the curry mixture.
  10. Now place sticky rice in a bowl along with curry over top and cilantro to garnish!
This meal was warm and comforting, perfect for a fall day!  Enjoy!

Melissa


Sunday, October 28, 2012

Crockpot Chili (Paleo)

Good morning!  Now that I've filled my belly with a delicious breakfast and got a little coffee in me to wake me up I'm ready to tackle the day.  Today is the day... the day Julie and I get to cook together and I can't be more excited!  More about that later... right now I want to tell you about the awesome crockpot chili I made last night... well I put it together yesterday morning and ate it last night!  It's paleo style which means no beans in this chili.  Wondering what the heck you put in chili if you don't have beans?  I'll tell you... veggies!  I know I know... you're probably thinking you don't want something like chili, which is delicious and hearty, to be ruined by more veggies but I dare you to try it.  You'll be shocked by how good it is!

I changed a few things in this chili to make it work with what I had.  I used ground turkey instead of grass fed beef (which I love by the way just had turkey I needed to use), I added carrots, and didn't use bacon fat... just Olive Oil. Contemplated adding zucchini but I decided I'd need it for those muffins I made yesterday too!  I'm pretty sure sweet potatoes would rock in this recipe too... next time?  We've found that chipotles and sweet potatoes are an awesome combination, just so you know!

Crockpot Chili (Paleo)
Adapted from Free Range Human

Ingredients
Instructions
  1. Heat bacon fat (or olive oil) in a large pan over medium heat.
  2. Add garlic and onion; saute until tender but do not burn.
  3. Add the ground beef and cook until about medium (just long enough to brown most of the meat).
  4. Once browned, add meat/garlic/onion mixture to the crock-pot.
  5. In no particular order, add in the celery, bell pepper, diced tomatoes, tomato paste, cacao powder, chipotle peppers (if used) and spices.
  6. Stir all ingredients well and set Crock-Pot to low and cook for 6-8 hours, stirring occasionally.
  7. Serve and enjoy!
 ~ Melissa

Saturday, October 27, 2012

Almond Zucchini Muffins (Paleo)

Hey foodies!  Well I finally found some time today to make a few different and NEW things!  I was way stoked to be in the kitchen today... so much so that I couldn't sleep... ok, that's not really the reason I was up bright and early but it helped!  After a crazy busy week going to Fire Fighter classes, an ambulance driving class, and a 24 hour on call shift that ended at 8am this morning... I was ready to get the heck out of the fire station and into the kitchen.  As soon as my shift ended I headed to the grocery to get the supplies for the day.

I started out prepping this great paleo chili that needed 8 hours for the awesomeness to simmer and then headed to the gym for a quick workout.  After getting cleaned up I started the muffins which I was dying to make because I've never made any baked good (I don't bake that much anyway) without regular flour!  This was truly going to be an experiment in which I had not the slightest idea how it'd turn out!  Guess what... they turned out great!  I have a few ideas for some changes (trying to stick within the paleo rules still) that I'll try for next time but for the first time with these tasty bites I was pretty happy.

They were moist (isn't that a horrible word? I hate it but what can I do...) and the texture was more on the spongy side.  I love dense healthy muffins so these were a little different.  I just can't wrap my head around the idea that ALMONDS can create muffins with a texture pretty dang close to a normal muffin (not the so dense you know they're healthy muffins).  How the heck does that work?!  I guess I can deal with not understanding and just enjoy the fact that it works!

So... here's how it works....  Oh and by the way, this was actually supposed to be a bread but I wanted to be able to sample them and share them with more people so I decided to go with the mini muffins!  Ready?  Here we go...

Almond Zucchini Muffins (Paleo)
Recipe adapted from Running to the Kitchen
 
Ingredients
  • 1½ cups almond flour
  • 1½ teaspoons baking soda
  • ½ teaspoon salt
  • 1 teaspoon cinnamon
  • 1 cup grated zucchini, water squeezed out
  • 3 eggs
  • 3 tablespoons maple syrup
  • 1 banana, mashed
  • 1 tablespoon coconut oil, melted
Instructions
  1. Preheat oven to 350 degrees and grease two mini bread loaf pans.
  2. Combine dry ingredients in a small bowl and set aside.
  3. Combine wet ingredients besides zucchini in a stand mixer and beat on medium for about 2 minutes. Alternatively, combine in a large bowl and whisk together vigorously.
  4. Add zucchini and mix until combined.
  5. Pour dry ingredients into wet and mix until incorporated.
  6. Pour batter into loaf pans.
  7. Bake for 32-35 minutes until a toothpick comes out clean.
  8. Remove from oven and let cool for 5 minutes.
  9. Transfer bread out of loaf pan and cool on wire rack.
ENJOY!!
- Melissa


Thursday, October 25, 2012

So much food, so little time!

Well it's Minnesota which means it can go from sunny and 70 to cold and snowing overnight.  While the weather wasn't THAT nice yesterday it has gotten colder, as I sat at work today I watched the rain turn to snow in just seconds.  This weather makes me (and I think many others) want to curl up next to a fire and take a nap.  It also makes me want to go to town cooking!  Nothing sounds better than a big bowl of comfort food with family and/or friends.  So with the weather turning I've been busy looking for new recipes to experiment with but I haven't had any time to cook!  This fall is crazy busy and I'm just ready for a long day spent in the kitchen with my best friend.  I think we might get that chance on Sunday!!  Woohoo!! 

Anyway... just thought I'd throw out there some of the things I've been dying to make and will hopefully be posting about in the near future when I can manage to squeeze in some much needed cooking.  Recently I've been pretty interested in this whole Paleo thing so I figured I'd try and make some crazy paleo recipes.  I'm always entertained as I see all the Paleo versions of food that everyone loves but isn't necessarily the best for the body.  I've kind of always had the theory that if you're going to eat something that's bad (meaning delicious, probably high in fat and maybe sugar too) then you should just go all out and not try to make it healthy.  It's not a bad thing to indulge every now and then!  However, there are some pretty interesting Paleo things that represent some of these 'bad' foods we all love.  I'm fairly certain that these treats are still meant to be eaten in moderation but hey, if you can make something delicious and healthier than it's non-Paleo counterpart... I'm all in.

The other day I got a bunch of Almond flour and Coconut flour, these seem to be the base in most Paleo baked goods.  I'm excited to try my hand at this in the next few days so here are some of the things I'm looking to try out.

Baked Goods:

Pumpkin Spice Bread
Almond Zucchini Bread (Paleo)
Paleo Pumpkin Pancakes
Paleo Pumpkin Muffins

Can you tell I'm into the whole pumpkin thing right now?  It's fall... gotta go with the fall flavors!

Dinners:

Pumpkin Cashew Coconut Curry over Coconut Rice
Enchilada Chicken Stew
Brazillian Curry Chicken

Ok for real... that's barely a dent in the real amount of recipes that I want to make...not just at some point in my life but right NOW.  I think I have a lot of work to do in the kitchen... maybe I just need to quit my jobs and cook?  Ha!  Maybe one of these months (January? when fire classes are over??) I'll be able to have more time for some serious cooking but for now I'll just have to be content with whatever time I can actually get!

Time for some family and football.  Hopefully you'll be seeing a few of these recipes in the next week! 

Melissa

Tuesday, October 23, 2012

Chocolate Peanut Butter Protein Balls


My favorite part about these tasty treats is sharing them....not because I'm nice....instead, it's because I'm inappropriate. I love asking people (man, woman, child; it matters not a bit), "Would you like to try my balls?"

My second favorite part is that although these balls seem like they should be slightly decadent, they're not.  The sweetness comes from dates (nature's candy).  I feel like dates are the tofu of the sweet world...they easily morph into whatever sweet flavor you desire.  By simply processing them and adding cocoa powder, some finely ground almonds and vanilla extract, those dates turn into a fine facsimile of an undercooked brownie.  YUM.  By the way, the chocolate layer is delicious by itself, made into balls or bars or whatever shape you want.  However, if you want to go to the next level of deliciousness (warning, this level FOR SURE will require an ice cold glass of milk), add the peanut butter layer.  Somehow, some way, when peanut butter meets vanilla protein powder, MAGIC happens.  Trust me on this.

These make the perfect grab and go snack.  They're ideal for those days when you overslept and don't have time for breakfast.  Your kids will love snacking on them between football and hockey practices (those 2 sport nights...gotta love 'em).  Best of all, these delicious balls freeze well so you can always keep them on hand.

Chocolate Peanut Butter Protein Balls

Inspired by Texanerin

Chocolate Layer

  • 1/2 cup whole almonds
  • 1 cup pitted dates
  • 3 Tablespoons cocoa powder (to increase the protein content, up to half of the cocoa powder can be replaced with your favorite chocolate protein powder)
  • 1 tsp vanilla extract

Peanut Butter Layer

  • 1/2 cup creamy peanut butter
  • 2 scoops (roughly 3/4 cup) of your favorite vanilla protein powder
  • 1 tsp vanilla extract
Begin with the chocolate layer.  Put your almonds in a food processor and grind them to the consistency you desire.  Add dates and pulse till the dates are finely ground.  Then add your cocoa powder and vanilla and pulse till the mix is uniform.  Dump the chocolate part onto a Silpat or piece of parchment.  Use your fingers to press it down flat.  The process will look like this:


Then, mix together the peanut butter and protein powder with a hand mixer.  Once the protein powder is thoroughly incorporated, put it on top of the chocolate mix and spread it out as evenly as possible.  One way that works well is to put another Silpat or piece of parchment on top and use a rolling pin to flatten it.  This isn't an exact science.  If you have a lot of chocolate sticking out on the sides, just fold it over onto the peanut butter part.  After you have the peanut butter where you want it, cut (GENTLY with the back of a butter knife if you're cutting on a Silpat) into squares. The number of squares will depend on how many balls you want to make.  Roll each square into a chocolate peanut butter tie dye looking ball of goodness.  I think these are best refrigerated and don't forget, they freeze well!


ENJOY!
~Julie