Monday, October 22, 2012

Avocado Cucumber and Buttermilk Soup


Avocado, Cucumber and Buttermilk Soup with Grilled Shrimp

Serves about 4 as a first course, 2 as a main dish
Inspired by Five and Spice


One of my favorite meals this past summer was on a super steamy June evening.  Melis was over and we wanted to cook without making my kitchen unbearably hot so we settled on this dish.  It was almost too hot to eat so we knew if this recipe failed, it would be no biggie.  It was the OPPOSITE of failure!  Instead, the result was a delicious, cooling meal. 

I know, I know....buttermilk sounds scary but it's not.  Buttermilk has the fat content of 1% milk, a tang like sour cream and the body of heavy cream.  It's every good thing.  I've always loved to drink it...I'm sure when I was little it was partially to gross people out, but I truly love it now.  BUT...don't be fooled...just because it SOUNDS decadent and creamy, don't try putting it in your coffee like my sister-in-law Tracy did.  It WILL be chunky.  Gross.

Melis and I decided to grill some shrimp to go with it.  We collaborated to come up with a quick marinade with a lime base.  The results were amazing.


Avocado, Cucumber and Buttermilk Soup
Serves about 4 as a first course, 2 as a main dish

This soup is creamy, cool and refreshing! 
  • 1 medium cucumber, cut into chunks
  • 2 ripe avocados, cut into chunks
  • 1 1/2 cups buttermilk
  • 1/2 tsp. salt
  • dash of cayenne pepper
  • juice of 1 lime
  • chopped cilantro for garnish
Put the cucumber and avocado chunks into a blender.  Add the buttermilk, salt, cayenne pepper and lime juice.  Blend till it's completely smooth. 

Transfer to a bowl and cover with plastic wrap placed directly on the surface of the soup (to prevent discoloration).  Chill for 1-2 hours then place in bowls and garnish with cilantro....and grilled shrimp, if you desire.


Quick (or so) Grilled Shrimp Marinade
Serves 4 (or so)

This recipe is VERY precise.  NOT.  Play with the amounts...I'm fairly certain you can't go wrong.
     
  • juice of 2 limes (or so)
  • 1/3 cup of olive oil (or so)
  • salt (to taste)
  • a pound of peeled and deveined shrimp (or so)


Combine liquid ingredients in a bowl.  Add shrimp and marinate for 15-30 mins (or so).  Drain and grill till shrimp is cooked.

Pile shrimp on top of or next to your chilled avocado, cucumber and buttermilk soup, crack a cold beer and enjoy it all in moderation (or so).


~Julie

Sunday, October 21, 2012

Duluth Grill... our experience and remaking of the Asian Peanut Burger


Last August we decided to experience the awesomeness that is the Duluth Grill in Duluth, MN.  Yes... I do realize it's more than a year later and I'm just getting around to writing this... don't worry, the experience was one that we won't be forgetting and recreating it for you shouldn't be too difficult!


We're both really familiar with Duluth after all the hockey tournaments and weekends we've spent up there over the years, taking a trip for the day was no big deal and something we were excited about!  We had heard about the Duluth Grill through friends and it was even featured on the well known foodie show Diners, Dine-ins, and Dives!  We figured we needed to find out for ourselves what all the talk was about.  Since it's a 2 hour drive we decided to make a day of it and eat more than one meal there... who wouldn't want to try as much as possible?!  Since breakfast is one of our favorites we left bright and early (with a detour to Toby's for a sweet treat to hold us over haha) and ended up at the Duluth Grill around 9.


Our gameplan... to order a few things and split everything.  We were hungry... but I don't think we were quite ready for the amounts of food we managed to order for TWO PEOPLE!  Typical.  Our order included Chorizo Sausage Skillet, a Scotch Egg, Red Flannel Hash, Seven Grain Porridge with yogurt and fruit, and a gigantic pancake.  If memory serves me right we did manage to make a considerable dent in our meal with no room left in our bellies for another bite!  The seven grain porridge had a chewy texture with a nutty flavor.  The Red Flannel Hash was a combo of beets, carrots, sweet potatoes, onions, and bell peppers perfectly roasted.  The skillet left nothing to be desired.  The pancake was good and different, it had cornmeal in it and it gave it sort of a cornbready taste and texture.  Last but not least the Scotch Egg... this was my first experience with it and it was definitely different!  I liked it but I can't say it's something that I would order again.


 After filling ourselves with a tasty breakfast we headed out into town to walk around and check out the views.  We finished the morning at the beach on lake Superior and enjoyed soaking in the sun and even caught some of the chilly water to cool off!

Before leaving town we had one final stop to make at the Duluth Grill for an early dinner.  Still half full from our breakfast we managed to find some more room to fit in a burger.  We decided to split two different burgers and we each picked a few sides.  The burgers we chose were the Bisapeno-Pepper Burger and the Asian Peanut Burger.


Bisapeno-Pepper Burger: The bolder bison burger smothered with pepper-jack cheese, fresh sliced jalapeƱos, caramelized onions, and roasted red peppers. Served on a grilled multi-grain bun smeared with fresh guacamole, topped with roasted red pepper vinaigrette.

Asian Peanut Burger: Homemade spicy peanut sauce, bib lettuce, fresh cilantro, roasted red peppers and fresh avocado together with our 100% grass fed beef burger topped with an over easy egg all on a grilled multi-grain bun.

Both burgers were amazing and we left (again with full bellies) thinking about how we could make our own version of the Asian Peanut Burger.  Everything about the burger was delicious!  We already had an awesome peanut sauce recipe... we decided to give it a shot!  For more info on how to make your very own Asian Peanut Burger check out our Asian Peanut Burger post!  You'll get all the yummy details about what makes this one of the best burgers you'll sink your teeth into!

Overall, our trip to the Duluth Grill was a HUGE success!  Not only was the food great, the views, company, and whole experience was one of a kind.  We'll definitely be making a return trip to the Duluth Grill in the future... either between hockey games or a special trip just for the experience!  We recommend checking it out if you're in the area! 

~ Melissa
Our Asian Peanut Burger


Saturday, October 20, 2012

Slow Cooker Chicken Tikka Masala


 There's just something about sitting down to a hot bowl of food that has been simmering away all day while you're busy with life.  Comfort food is something that everyone loves and it comes in all forms.  For me anything that cooks in a crock pot all day is comforting!  Fall is my favorite season and it's when some of those crock pot comfort foods are at their best!  I found this recipe last fall when I was gawking at all the delicious pics on foodgawker and was immediately excited to try it!  I made this one by myself but with my little brother in mind.  I was staying with him for the week while our parents were out of town and he always likes when I cook for him.  I was hoping this would be something that we'd both love!  I hope you enjoy this recipe as much as we did!

 Slow Cooker Chicken Tikka Masala
source: adapted from Smells Like Home

 Ingredients:
For the Chicken:
  • 9 whole boneless, skinless chicken thighs (you can use breasts if you prefer white meat)
  • 1 tbsp ground coriander
  • 1 tbsp ground cumin
  • 1 tsp Kosher salt
  • 1 cup non-fat plain Greek yogurt
  • 1 whole jalapeno or serrano pepper, stem removed, pepper pierced several times with a sharp knife


For the Sauce:
  • 4 tbsp butter
  • 1 whole large onion, peeled and diced
  • 6 cloves garlic, peeled and minced
  • 1 tbsp Kosher salt
  • 3 tbsp garam masala
  • 1 piece fresh ginger, about 2-3 inches, peeled and grated or very finely minced
  • 4 cups crushed tomatoes
  • 1 tbsp sugar
  • 2-3 tbsp heavy cream
For Serving:
  • 4 cups cooked jasmine or basmati rice, hot
  • cilantro for garnish
Instructions:
  1. Cut the boneless, skinless chicken thighs into 1- 1 1/2 inch pieces. Sprinkle the coriander, cumin and salt over the chicken, then stir in the yogurt until all the pieces are evenly coated.  Place the chicken in the bottom of a 6-quart slow cooker and put the jalapeno on top of the chicken.
  2. To prepare the sauce, melt butter in a medium saute pan over medium high heat. Add the onions, garlic, and salt, then stir. Cook, stirring frequently, until the onions begin to lightly brown around the edges.
  3. Stir in the garam masala and ginger and cook until fragrant (about 1 minute) before adding the crushed tomatoes and sugar. Stir well, scraping the caramelized bits from the bottom of the pan, and bring to a boil. Pour the sauce over the chicken in the slow cooker.
  4. Cover and cook on low for 5 hours, or until the chicken is very tender.
  5. Pour heavy cream into the slow cooker and stir gently until the color is even. Replace the lid and let cook for 10 minutes or until bubbly around the edges.
  6. Serve over hot rice topped with a generous amount of chopped cilantro.
 I added 1 or 2 minced serranos to the sauce to give it a little kick, I like my food spicy!
Another great addition is some warm Naan Bread to go with the meal.  It's great for dunking in the sauce or for making a little wrap with everything.  This recipe is delicious the same day but it gets even better after sitting a day!

Enjoy!

Melissa


Pumpkin Cheesecake French Toast

It's the time of year again... the leaves are changing colors, the air is cool and crisp and the produce of the season is ready for all sorts of fun treats!  A few years ago I found a recipe for Pumpkin Ginger Cheesecake and I thought it sounded kind of good and interesting.  For thanksgiving that year I decided to try it out and see how my family liked it, turned out it was a huge hit in the Mondo household!  This got me thinking... why can't I make a stuffed french toast with something similar?


From that came a new and delicious creation!  Now... for the most part I try to make food that isn't just delicious but is also pretty healthy.  I have to admit... there's really not much healthy about this recipe but sometimes you just have to let loose and enjoy it.  Some things aren't meant to be healthy and my thought is... if you're going to do it, do it right!  So here it is... french bread stuff with pumpkin cream cheese and dipped in a creamy sweet batter.  Just writing that made my mouth water a little :)

The recipe is fairly simple to make but it takes some time to put it all together, it's nice to have a little help so grab a friend, family member, kid and enjoy each other and the relationship while you create a tasty little treat for everyone to enjoy!

Pumpkin Cream Cheese:   

• 5 oz cream cheese  (soft)
• 2 Tbsp raw cane sugar
• 1/4 tsp cinnamon or a little more
• Dash of nutmeg... I just shake it a few times or if you're grating it probably like a 1/4 tsp or a little less
• Dash of allspice and clove, don't need a ton.
• 1/2 tsp vanilla
• 1/3 cup pumpkin puree


You're going to want to pull out the cream cheese and leave it on the counter for a few hours before you make this or it will be too hard to mix!  In a mixing bowl mix together the cream cheese and the raw sugar until smooth.  Add all the spices, vanilla, and pumpkin puree and whip till it's all blended together and creamy.  The amounts of spices you put in is kind of up to you, you might love cinnamon... add a little more!  You can't really mess it up so taste it and add more of anything you like... make it your own!  When you have the mixture ready to go, grab a sandwich size or quart size ziploc bag and scoop the cream cheese into it (try to place it in a corner of the bag).  When you're ready to stuff the french bread you'll just have to snip a little corner off the bag and you have yourself a nice little tool for squirting the cream cheese into the bread!  (I apologize to all you bakers for not knowing the correct name for this tool... or having the real thing!)


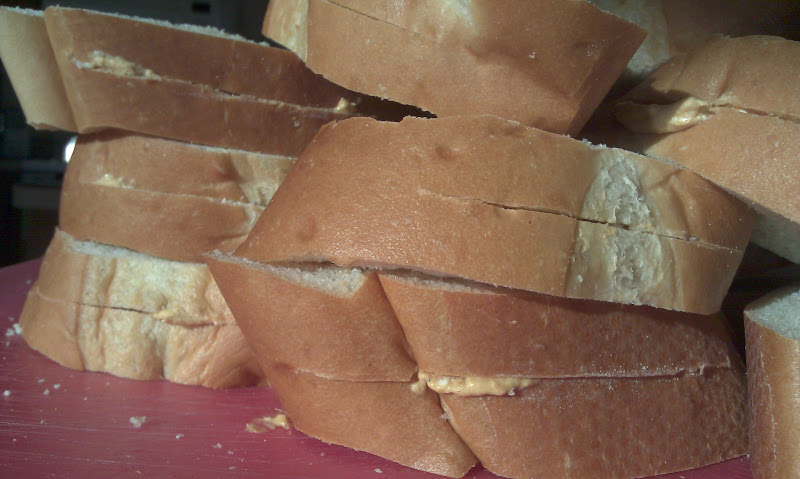
To prepare the bread, slice it at an angle in about 1.5 inch slices.  From my experience french bread almost always has holes in it so you might want to buy a little extra just in case!  Take all the solid pieces and on the top (or bottom) cut a slit almost as long as the slice and work your knife inside to make a little pocket for the cream cheese.  It's easiest to prep all the bread and then stuff it all at once.

When you have all the bread ready to go take a slice and insert the baggie into the slit and squirt some cream cheese in there.  It doesn't have to be pretty and you'll probably over stuff the first few :) but try to just add enough to keep it inside the pocket.  You can probably get about a Tbsp of cream cheese into there.  Try to spread it out inside as you fill the pocket.  Repeat until you run out of cream cheese filling.  The mixture probably fills about 20-30 pieces depending on the size of the bread.


French Toast Batter

• 4 eggs
• 2/3 cup whole milk
• 1/3 cup flour
• 1/3 cup sugar
• 1 tsp vanilla
• 1/4 tsp salt
• 1/4 tsp cinnamon


You're going to want to at least double this recipe.  Double should make a pretty good amount and you'll be able to make some regular french toast as well.  Add all the ingredients to a mixing bowl and blend until smooth.  A stick blender works great for this!

Ok you have your batter ready, the french toast is stuffed so now all you have to do is dip and cook!  Get your griddle to about 350 degrees, throw some butter on there if you want and you're ready to go.  Dip your pieces into the batter making sure to fully coat the entire piece, let the excess drip off before you throw it up on the griddle.  These are pretty thick pieces of french bread so it takes a little longer to cook them.  Be sure to cook them a little slower so the insides get hot and cooked through at the same rate as the outside.  You'll just have to experiment a little to figure out how hot it needs to be.


Top the finished french bread with a sprinkle of cinnamon and maple syrup and enjoy with a hot cup of fresh coffee!  Make sure you have plenty of friends and/or family to share the experience with.  Enjoy the relationships as you filly your tummies!

~Melissa

Wednesday, February 1, 2012

Banana Pancakes

Pancakes... a simple option with so much room for improvement!  We've all grown up eating plain old buttermilk pancakes... don't get me wrong, they're definitely delicious but oh the yummy choices we've missed out on!  It wasn't till I was out of college that I realized there are so many options to make something that is already pretty dang good even better! So I started experimenting, maybe it was the Jack Johnson song Banana Pancakes that got me thinking... or maybe it was just my love of breakfast and my curiousity that turned my boring plain buttermilk pancakes into an adventure.

Before I go into detail on this newfound deliciousness let me give you a little background.  I haven't always loved breakfast.  I ate it because I had to and there wasn't anything special about it.  At some point in my life, I'm not really sure when, I started to appreciate breakfast in a whole new light.  (I'm quite positive my dad's love for this meal had something to do with it, afterall... I am like him in almost every other way!)  I think my extreme passion for health and fitness started to develop about the same time and the rest is history.  I started coming up with healthy but tasty breakfast options ranging from gluten free pancakes to different varieties of oatmeal and hot cereals.  Creating new items and experimenting with flavors was something that I really started to enjoy and become excited about.  Now don't get me wrong, I don't ALWAYS go for the most healthy thing I can come up with.  Sometimes you just have to go for it and enjoy yourself and if you're going to do it, do it big!  As long as it's not an every day thing it's OK! :)

So here it is... banana pancakes, not the most healthy but I put my own little twist on it and made it a little bit better for us!


Here's the recipe that I used:
 Adapted from LivLifeToo
 Banana Pancakes

1 cup rye flour
1 cup white flour
2 tsp baking powder
1/4 tsp salt
2 tsp cinnamon (more or less depending on preference)
1/2 tsp freshly grated nutmeg (oh so delicious)
1/4 cup brown sugar
1 egg
1 1/2 to 1 3/4 cups almond milk
1 tsp vanilla extract
2-3 large ripe bananas, diced
2 Tbsp olive oil
Dried unsweetened coconut
Toasted walnuts

In a large bowl combine the flour, baking powder, salt, cinnamon, and nutmeg. Mix these ingredients up so they're well blended.  In a smaller bowl combine the milk (start with 1 1/2 cups, more can be added if necessary), brown sugar, egg, vanilla, and oil and whisk.

Slowly add the wet ingredients to the dry ingredients and continue to whisk making sure to break up any chunks of dry flour that form.  If batter seems too thick and a little more milk to thin it out and whisk until it's smooth.  Add the bananas and gently fold them into the batter.

Heat a skillet to medium... I set mine around 300-350 degrees.  Pour the batter onto the skillet to desired size and sprinkle the dried coconut on the uncooked side.  Trust me... coconut with banana is amazing!  Cook until golden brown on the bottom before flipping!  These pancakes take a little longer to cook and the extra time is essential!  Don't rush it, keep the temp a little lower and let that batter in the middle start to set a little before the flip, you'll be happy you did!  The bananas will be perfect and the flavors you'll find on your tongue won't leave you disappointed!

Gather up your family and friends and serve up those hotcakes with some toasted walnuts and pure maple syrup!  A good cup of coffee goes along great as well!  Remember... cooking is an experience to be shared with those you love.  Build your relationships and enjoy the company while getting a little treat for your body as well!

Have a great day!

Melissa

Tuesday, November 15, 2011

Melanzane

Melanzane Sott'olio: In English this means Eggplant in Olive Oil.  But what is melanzane exactly?  Yes, it's eggplant but it's so much more.  It's a rich concoction of thinly sliced eggplant, spicy Anaheim peppers and loads of garlic and spices all happily bathing in a cider vinegarette.

Every family has traditions that are unique.  For the Mondos, the annual process of preserving eggplant has been passed down for generations.  Growing up in an Italian family, food was always the focus of our get togethers.  I can still remember making Melanzane with my grandpa and dad when I was a little girl.  When I got older and my grandpa wasn't able to help out, my dad and I took over making it together.  Making melanzane is a lengthy and social process with different steps that take time and is a perfect way to hang out with family and enjoy each others company while keeping the family tradition going!


We're sharing this process because it's become a tradition of our own; it's one of the first things we made together and it's something we have repeated every year since.  The first time Julie tried the melanzane was the first night we cooked together and she was adamant about learning how to make it as soon as she tasted it.  I taught her how to make it that fall, she shared it with friends (who also loved it) and the last two years we've taught our friends how to make it.  This fall 4 of us got together and made it (almost 8 gallons worth!). It's been a great tradition that we hope to pass on to more and more of our friends in the years to come.  We hope you enjoy hearing about the process and maybe.... you'll be able to give it a shot on your own!

The Ingredients:
Eggplant
Olive Oil
Apple Cider Vinegar
Garlic
Hot Peppers (Anaheim and hungarian)
Oregano
Salt

The tools:
Crock (size depends on amount made)
Wine Press
Food Processor

The process:
Part 1: Buy the eggplant and prepare it.  On this day we peeled all the eggplant and sliced it in 1/4 inch rounds.  The eggplant was then layered in the crock with salt to draw out all the water.  It's important to gently squish the eggplant between every few layers to help release the water.  After all the eggplant has been sliced, salted and squished, the water level should be above the eggplant.  To make sure the eggplant stayed submerged, we covered it with a plate and to keep it under the water.  Our first step was complete and the eggplant was left to rest for a week!


Part 2: After letting the eggplant sit for a week under its own water it was ready for the second half (and the FUN half) of the process!  We emptied all the eggplant into one half of the sink and repeatedly washed it until the water was clear.  It usually takes about 5 times of rinsing it under cold water before it's clean.


 The eggplant was still pretty thick and full of water so we layered it into a wine press and squished it down so it became thin.  All of the water that was still being stored came gushing out!  We kept squishing it till very little water trickled out and the eggplant was packed down to about a 1/4 of the size it started at!


Now comes the fun and messy part!  When we finished with the eggplant we pulled it all apart and got the rest of our ingredients ready to build our final product.  To make 8 gallons of Melanzane we used about 40 eggplant, about 3/4 bushel of peppers, 6 pounds of sliced garlic, 3 103oz jugs of olive oil, 3 quarts of apple cider vinegar along with an abundance of oregano and some salt.  Building and layering the crock is easy but what makes this so delicious is the right proportion of olive oil to apple cider vinegar.  Over the years we've found that a 3:1 ratio of oil to vinegar makes for the most amazing final product!  The best way to add the liquid is to pre-mix the oil and vinegar in a pitcher and just pour it in as you build.


All the ingredients ready to go!


Layering with peppers and seasonings!
Building the crock of Melanzane is really just a process in which all the ingredients are layered over and over again until the crock is full.  We started with a base of seasonings... some oregano and salt followed by a layer of eggplant, peppers, garlic, oregano, salt and topped off with some of the oil and vinegar mixture.  The aromas in the air were mouthwatering as we mixed all the seasonings together! 


The finished product!

All the hard work was done after we used up every last pepper and piece of eggplant, the kitchen was a mess, our hands were full of seasonings and we all wore big smiles on our faces.  We finished off the crocks by putting a plate over the top of eggplant and weighing it down with a jug of water.  It's good to keep all the of eggplant and peppers under the oil.  We covered the crocks with a towel and a dark garbage bag to prevent light from getting in and tucked them away to marinate!  After a couple weeks of the flavors blending the Melanzane was ready to try!

Melanzane over brie served with flatbread

Typically melanzane has been eaten on top of a fresh piece of bread but in the last year we've tried it many different ways.  We've found it to be a perfect match for soft brie, a great topping on a turkey sandwich, and amazing rolled up in a homemade loaf of bread.